Another Experiment at Midwest Permaculture
How one can attractively store woody brush to give it time to break down.
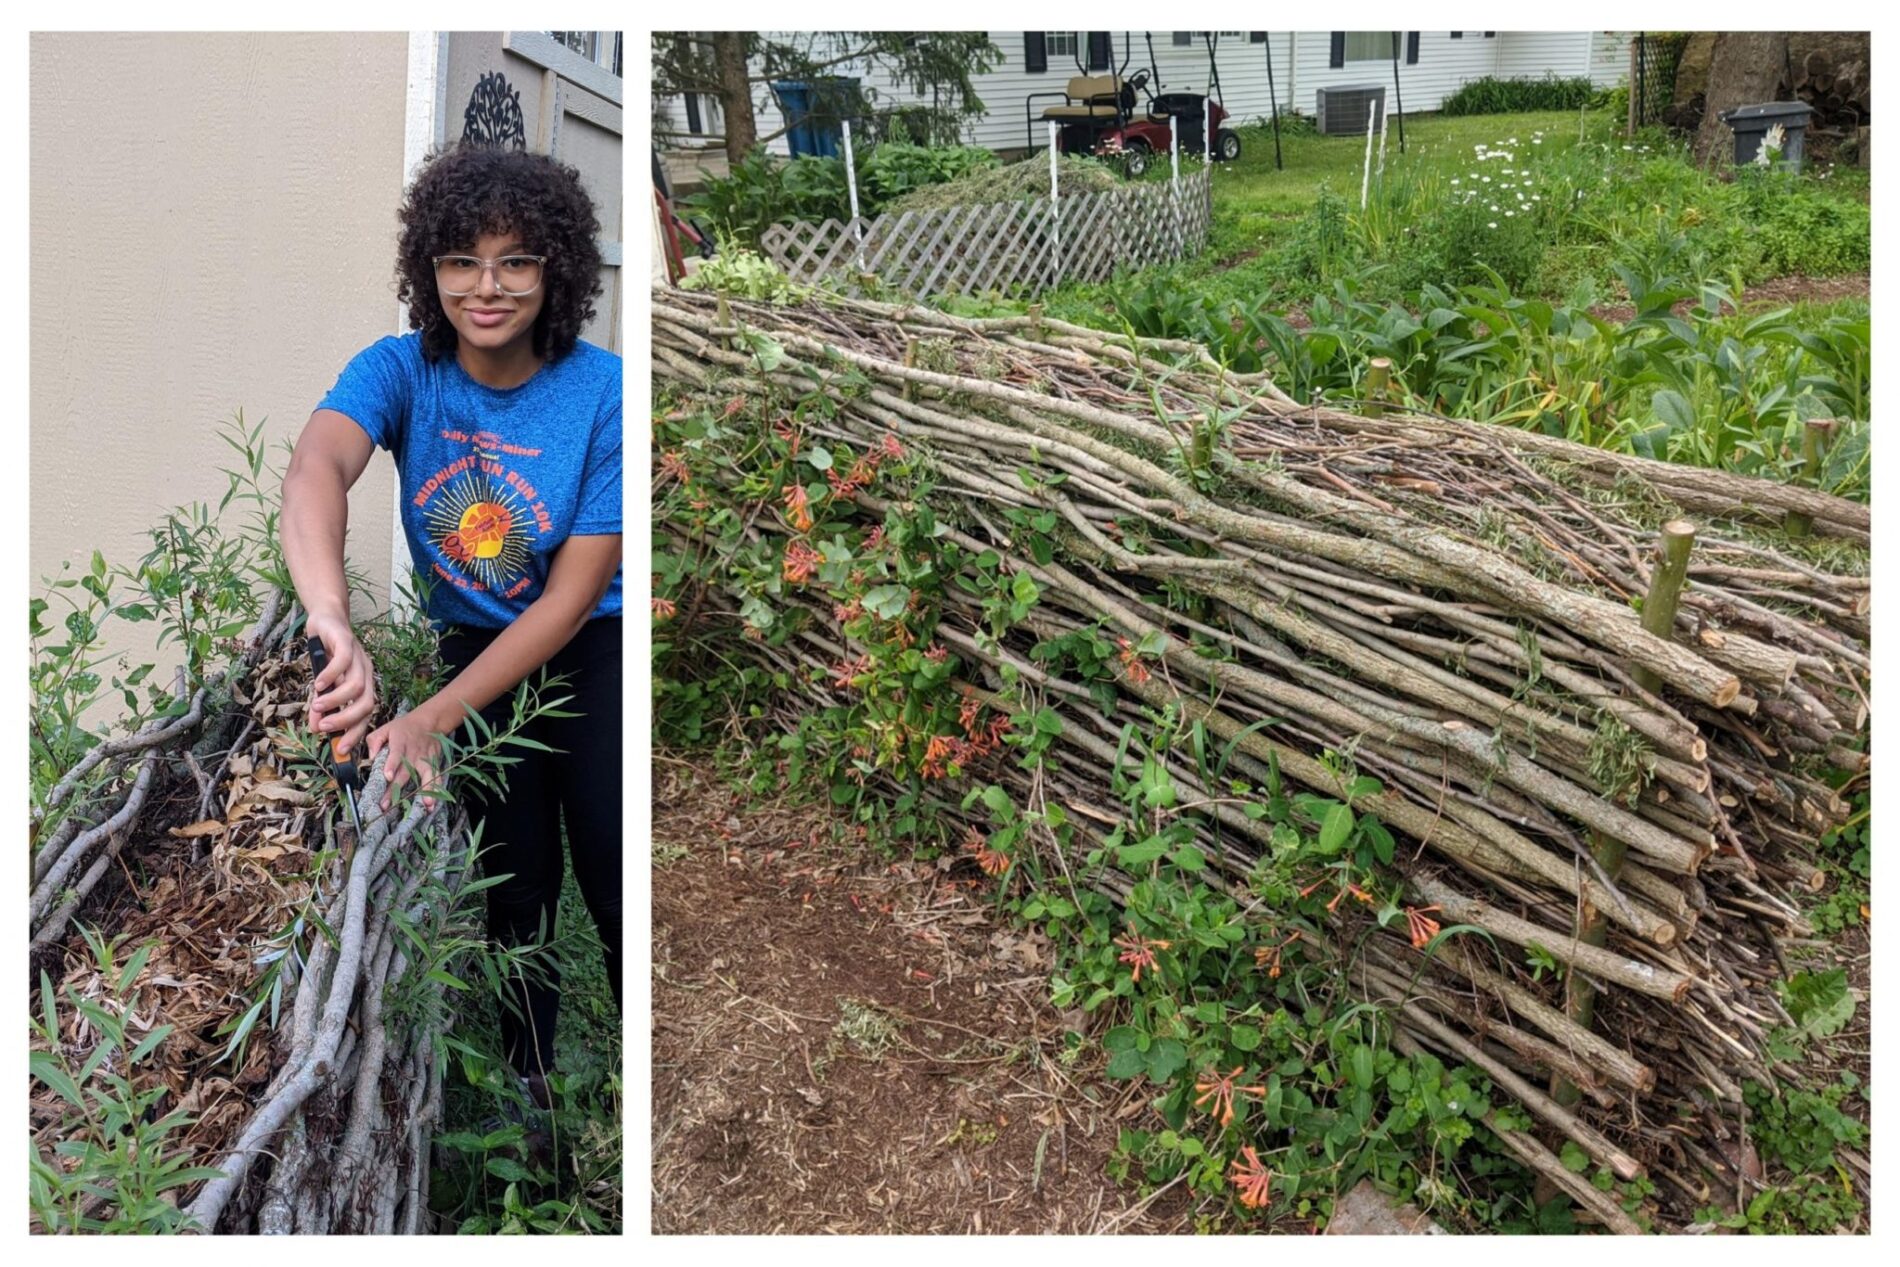
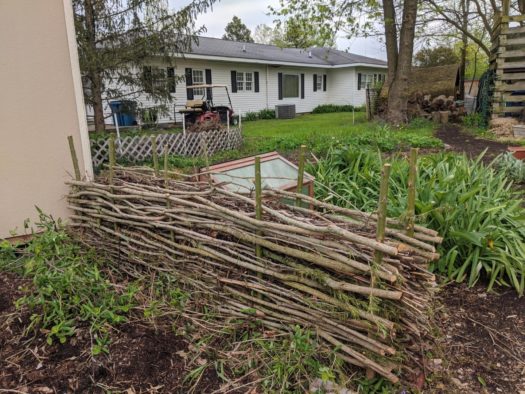
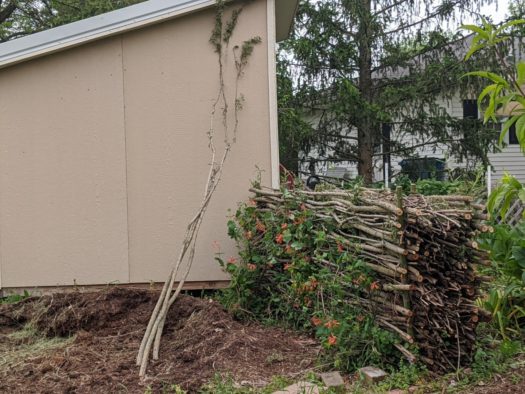
Hello permaculture friends. We wanted to give something a try. We have not seen this exact design in the literature or on YouTube (although it certainly could be out there) but the idea is to use our yard brush while also building a sturdy fence.
We wanted a fence that could be made from easily available willow, allow time for the finer brush from our yard that we packed inside to cold-compost in place thus fertilizing the plants near it, while also having something that looks nice in our backyard and neighborhood.
We came up with a combination of all these and are calling it a Woven-Willow Brush Fence for the obvious reasons, but we added the ‘Living’ prefix because the upright stakes are actually made from young austree-willow trunks which we drove a foot into the ground. Our thoughts and hopes were that the the living posts might actually sprout (like willow commonly does) and set down roots. They did!
 These uprights might be alive now for dozens (if not hundreds) of years which means they won’t rot or need replacing every few years. If the shoots coming off of them are pruned regularly we can keep the posts relatively narrow instead of them turning into 75′ high trees. Think ‘bonsai’!
Here is what 10 year old austree willows look like if they are not pruned. We certainly don’t want anything like this in a small space in our back yard.
The reason we went to the austree for posts is that as a willow they are relatively easy to germinate (they will send out roots and keep growing) and we already had the perfect size to make the posts on our CSC project property, right next to Stelle.
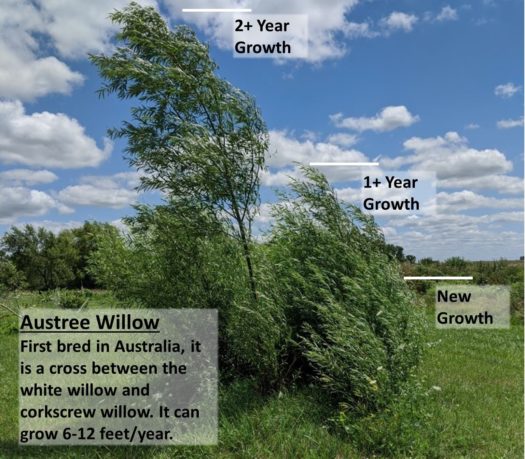
We created this austree germination bed several years ago when we were trimming the larger austrees. We have been pulling cuttings from this bed for various purposes in recent years. So we took out five of the 2-year old trees and cut the trunk lengths in half to make 10 posts. They are about 1.5″ in diameter.
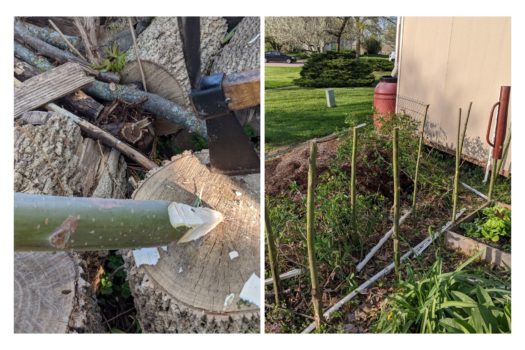
We sharpened the large ends of the 60-inch-long posts and drove them into the ground 12″ deep to leave 48″ (4 feet) exposed. The T-post driver worked perfectly for this.
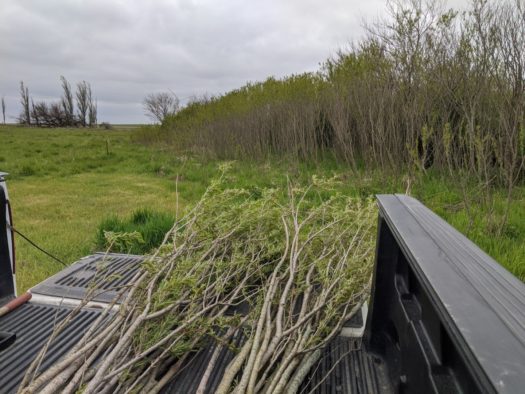
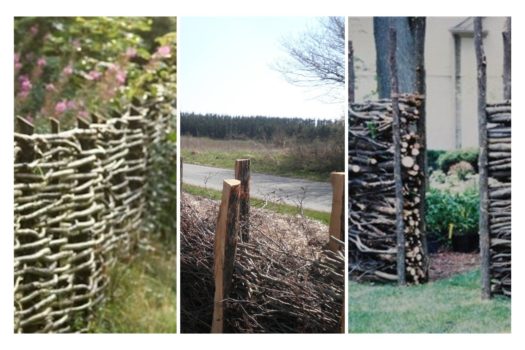
We then harvested ~12′ lengths from this black willow brush patch on the CSC land.
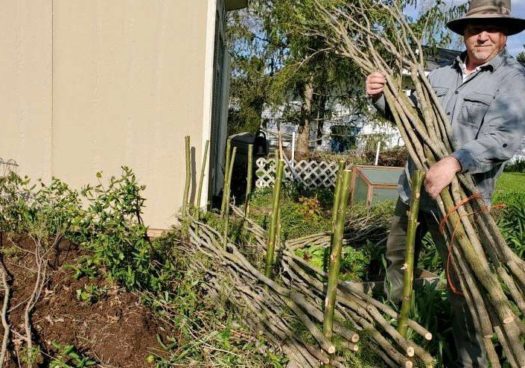
Photo: Bill holding willow for weaving
We would begin each layer of the weave with the large end of the branch, one on each side of a post, and weave them back-and-forth around each of the subsequent posts to the other end. Once there we would trim off the excess tips evenly to give it a clean finish. Then we would reverse this, starting from the other end and working back.
It didn’t take long and the walls began to rise.
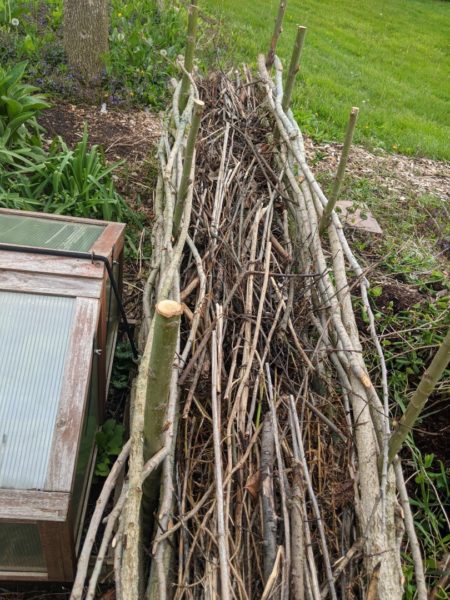
As the walls grew we started packing our finer brush into the middle.
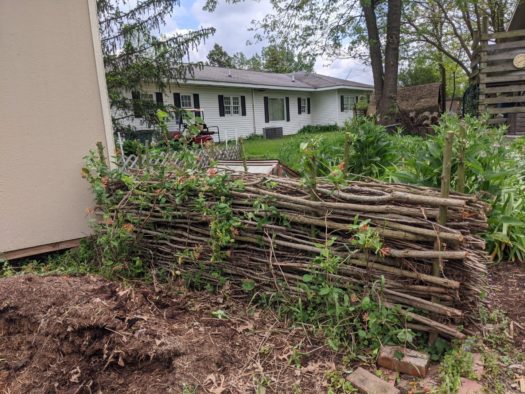
Once tall enough, we attached our already established trumpet honeysuckle to the fence which will become a wall of flowers by fall.
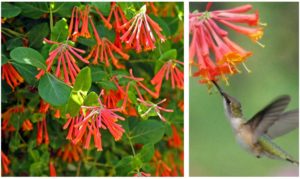
We love the hummingbirds that are attracted to the trumpet honeysuckle flowers.
We worked on this as we had time and within 4 weeks we made it to the full 4-foot height.
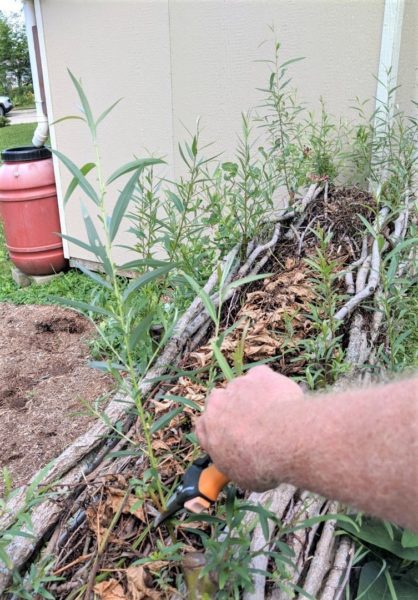
Within 6 weeks we were already trimming back the sprouts off the austree posts.
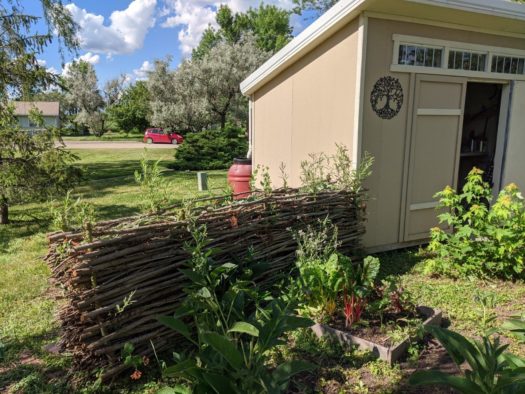
All done.
A lovely way to store woody brush trimmings.
We’ll do our best to add follow-up pictures in the coming years so we can all learn how this fencing idea works and looks over time.
Feel free to share your thoughts, ideas and of your own experiences in the comments below.
Although we are missing the fun this year (2020) that comes with teaching our courses and meeting so many great people as students, we are enjoying working on multiple projects that we just did not have the time to do until this year.
Covid Cheers… Be Safe… Bill and Becky Wilson
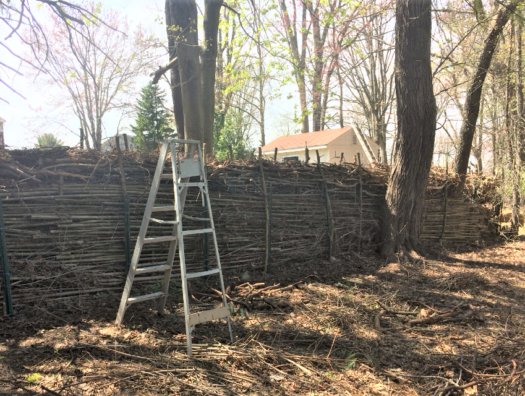
P.S. Here is a picture of a taller fence, of similar design, mentioned by Chris in the comments below. Thanks for the picture Chris. I like the way you integrated the existing trees into the structure.
16 thoughts on “Living Woven-Willow Brush Fence”
Are there concerns with fire? I have a wooded area around my cabin and would like to clean up some of the brush and deadfall but I wonder if the fire concerns would be different than the ability to allow the material to compost over time.
Great question Adam. Certainly, if someone lives in an excessively dry area where fires tend to be of real concern, then yes, this would become a fire hazard. It would burn fast and hot!
In the humid Midwest where we get a good amount of rainfall, this is rarely a concern but we do go through dry periods so do have a heightened sense of awareness.
Thanks
What a neat idea, I’ve got lots of branches lying around from trees I’ve pruned on my property. This certainly beats taking it all to the dump, and saves money.
Thanks
Nice, I did the same thing along my back property for privacy. I used metal garden stakes and bamboo cuttings to weave the sides. I then filled the middle with brush and branches from the yard.
I wish I could post a picture
Thanks Chris. If you wish to email us the picture we will post it. We’d all like to see it.
Will do. On a side note or for a separate conversation I’m growing an osage orange hedge as well. I planted a double row 12″ apart using seedlings bought on the internet as well as a slurry mashed from the fruit. Both rows will grow into a tightly woven hedge. So far the the seeds and saplings have done great.
Really great idea. I’ve been tidying up an acre or so of deserted/abandoned garden that was littered with branches like this plus many much larger. I’m doing more of a Hugelkultur bed to break down the larger branches I cut up with the chainsaw but am keen to try this as well!
Looking forward to your next visit Caron. Hopefully this year!
Very interesting fence concept. We should probably look more at different types of living fences. I’ve seen some in NZ. Can we make them hog and bull tight too? Shrub willow might be good material. Woven green, the fence might be able to be made quite tight. Salix species are also good browse material.
There is no question Victor that the fence could become hog/bull tight, especially if the austree posts set down permanent roots. I’ll update this post next year once we see if they made it through the winter. Cheers.
Commonly people used Osage Orange woven to make a fence horse high, bull strong and pig tight. It will grow from cuttings similar to willow. A very, very long lasting tree.
Very Cool Bill and Becky! Can’t wait to see it.
Wow! Wonderful!! It has made that spot look nice. It makes it exciting to store woody brush trimmings.
This is something worthy trying out surely.
Ha. We sort of cheated. It will eventually grab hold all by itself but to help it get started, I used zip ties.
Love this! We have the honey suckle our the front of our house on our existing fence which is falling to bits and would love to do this.
My question is, how do you attach the honey suckle???
Thanks
Amazing,would love to try it